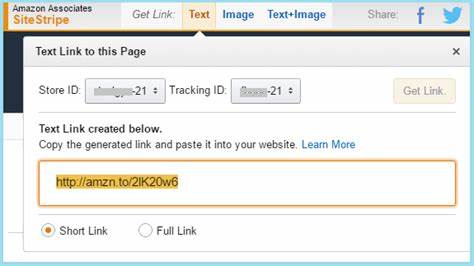
It’s been announced recently that Amazon is phasing out it’s so called “Sitestripe” images, where you could grab a simple piece of code from the affiliates SiteStripe menu bar in your account, and simply paste it into your website to render Amazon product images on your blog.
This was a great little feature to quickly and easily display Amazon products on a website, but it’s going away now. From December 1st, 2023, you will no longer be able to grab these images for either “Image” or Image and Text” from the Sitestripe (Text Only links still works).
In fact, as of late November even, the Image and Image and Text option is blanked out and can’t be used by associates:
![]()
And from 31st December 2023, any previously rendered SiteStripe images will no longer display on websites, so where your image was there will just be a blank space or an ugly icon indicating the image can’t be displayed.
This means if you’ve put a lot of these SiteStripe images on your site, you’ll need to switch them all out before the end of 2023, either using Amazon API rendered images (still work fine), or removing them altogether from your site. This can be a real pain if you’ve really used a lot of these on your website.
There are some plugins you can use to quickly switch over all your SiteStripe images to API images, but there’s no free ones I’m aware of. They’re all paid plugins and some quite expensive. For bloggers on a budget who are looking to save money right now, we’ll give a simple step by step guide on switching over all your Amazon SiteStripe images to Amazon API rendered images on your sites.
Whilst this can be a long winded and boring process if you’ve got a lot of these images to swap over, at least it’s free to do and you don’t need any expensive plugins to get it done (If you have to use a plugin, we’ll also cover some of these down at the bottom).
Here are quick steps:
- Get your Amazon API code and key
- Log into your Amazon account
- Go to Tools….Amazon API
- Load up Scratchpad
- Click on GetItems
- Enter product and affiliate details
- Enter your access key and secret key
- Select correct image category and size
- Click on Run Request
- The API image code will display
- Paste this code onto your website to display new API image.
Now let’s run through more detailed steps.
Step #1 – Get Your Amazon API Code
Firstly, if you’ve not already done so, you’ll need to get an Amazon API code to allow you to render images on your website though this method instead of the phased out SiteStripe method.
If you’re already a qualified Amazon affiliate/associate (you’ve made the required referrals to be fully accepted), getting your API is easy. Here are the steps:
1. Log into your Amazon account, click on Earnings on the top bar to load up your affiliates dashboard, then click on Tools:

2. On the Tools tab, click on Amazon Product Advertizing API
3. Scroll down the page and click Get API/Get Key
4. Follow the steps and be sure to note down or send to yourself an email with the Access Key and Secret Key that you’re given (these won’t be given yo you again after this first time).
Note – Once you’ve got your Amazon API key/code, you’ll have to wait 48 hours before you can use it. During this time you can grab all product ASINs in advance to make it easier, which we cover in Step #2 below.
If you’re not a confirmed associate – If you’re newly signed up to the Amazon Associates program and haven’t yet made the qualifying 3 sales in 180 days to be fully accepted onto the program, you can’t get the API key. In these cases, there’s a few alternative options available to you that I’m aware of:
- You’ll have to stop displaying Amazon product images on your site for the time being, and just use text links only to link to products.
- You’ll have to get alternative product images, either ones you’ve taken yourself (preferred) or ones from the manufacturer website (provided you’re allowed to use them).
- You’ll have to use a Premium plugin which can migrate all the images over for you (more on this below).
Note – Do NOT download product images directly from Amazon’s site and reupload them, nor take screenshots of the rendered images and use them. Amazon doesn’t like this and it’s an easy way to get thrown off the program entirely.
Step #2 – Note Down All The Product ASINs
While you’re waiting for your Amazon API credentials to become usable (usually takes a few days), you can make it quicker down the line by grabbing all the product ASINs from Amazon that will later need to be plugged into Amazon’s database to fetch the new image versions of the product images you want to display.
You can then note them down in a separate Notepad document, which makes plugging them in faster once you’re ready.
To do this, find all the product pages of images you want to continue displaying images for, and copy down the ASIN (product identifier code) for each one. It’s usually somewhere on the product page, sometimes under Product Specifications or Product Details.

Copy all these down and organize them in a way that makes sense for you and will make it quicker down the line for the next step.
Step #3 – Get API Codes
Once your API credentials work properly, you then need to fetch the new product image API code from Amazon’s own database.
Here’s how you do this:
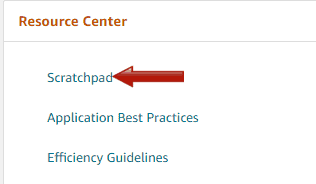
1. Load up the Amazon API page again by logging into your account, going to your Affiliate Dashboard, and then clicking on Tools and then Amazon Product Advertising API
2. Scroll to the bottom of this page and click on Scratchpad:
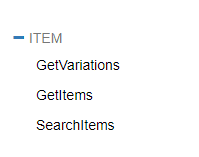
3. On the next page the loads up, click on GetItems on the left hand side:
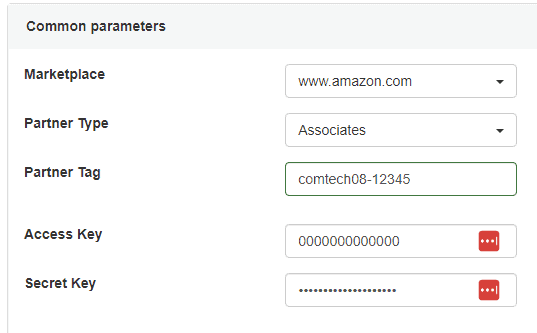
4. On the next page, you need to enter the product and your affiliate credentials to retrieve the API image code.
Common parameters section:
- Marketplace – the store you want to retrieve the image from
- Partner type – most people can just leave this as “Associates”
- Partner tag – Your affiliate tracking ID (eg. comtech08-12345)
- Access key/secret key – Given to you when you signed up for the API.
GetItems Section:
- ItemIds – Plug the product ASIN in here (will be quicker if you already noted them down in Step #2)
- Resources – select all product info you want to pull from the database. For images only, most of us can just select “Images.Primary.Small”, “Images.Primary.Medium”, or “Images.Primary.Large” depending on whether you’re using small, medium or large SiteStripe images (the Medium Scratchpad image mostly seems to correspond to the Large older SiteStripe image – see here for a full size guide for API images).
- Select any other product info categories if you want to fetch them also.
- Add a new parameter – most of us can leave this blank most of the time.
Once you’ve plugged in everything you want, click Run Request at the bottom of the GetItems section, and it’ll fetch all the info you’ve requested from the API and display it in code form in boxes further below.
Step #4 – Insert New API Code Into Your Website
The rendered information will display in multiple different code formats, but most of the time, most of us will use HTML code, so switch to this tab and copy the code that appears.
You can then use the Text Editor in WordPress to paste this code in, and the newly rendered (and hopefully still working) API version of the product image should display. These images can also be left/center/right aligned the same as the old SiteStripe ones.
You’ve now replaced your SiteStripe image with an API one, which will continue to work fine for the foreseeable future.
Repeat these steps for all the product images you want to replace.
Demo video – switching from SiteStripe to API Images
https://www.youtube.com/watch?v=6ZP-86MDN2c
Premium Plugins That Can Also Migrate Your Sitestripe Images To API Images
If you’ve got dozens or hundreds of these SiteStripe images across all your sites, switching them over manually is going to be a real pain for sure. If you’d rather not be doing this, there are plugin options, but not any free ones I’m aware of.
1. AM Image Master (API Key Required) – A cheaper, stripped down plugin that can just migrate over your SiteStripe images to API ones, but not much else (but also cheaper than the other options listed for this reason. A free trial is available, but it only covers 10 posts. Premium version available from $47/site. See the 5:30 mark of this video for a demo using this plugin to switch over all SiteStripe images to API ones using this plugin. Just plug in your Amazon API key, associates tag, and select your preferred image size (Medium roughly corresponds to the “large” Sitestripe size, but a bit smaller), and the plugin will bulk change all your images to API ones that’ll still work.
Warning – there’s no “undo” or “revert” with this tool, so if you don’t like how your Amazon images look after bulk processing them, you’ll have restore from backup or change them manually. The sizes might be slightly different to before, but won’t be a million miles off.
2. Lasso (No API Key Required) – The best plugin I’ve seen so far for migrating over SiteStripe images is Lasso, who’ve just recently added this functionality in advance of the SiteStripe changes in December 2023. Plug in any Amazon product link and they’ll fetch the image and other data automatically – and they’ve specifically added features to make sure Amazon SiteStripe images can be switched over, even without an API key.
On the downside, Lasso is a Premium plugin with no free trials (14 day money back offer though), so you will have to pay. And plans are quite pricey and billed annually. But it’s the easiest way to switch all your SiteStripe images over if you don’t want to waste time doing it manually (see here for a video demo of using Lasso to do this).
3. AAWP – Another useful all round Amazon Affiliates plugin that can help you create appealing looking product boxes with buy buttons and also fetch images as long as you’ve got an Amazon API key. Good for switching over and tidying up your images, but again it’s a paid plugin with plans starting from $21/month billed annually.
4. AzonPress – Another Amazon plugin with a lot of functionality. If you want, you can just fetch simple product images like you did with SiteStripe using the API instead, but you can also add much more fancy features with this plugin as well. Is another paid plugin but has the cheapest initial layout at just $31 for a single site at the current time.
There are probably other plugins which can do a similar job for you, but these 3 are the main ones I’m aware of myself. Unfortunately, I’m not aware of any free plugins that’ll automatically switch over all your SiteStripe images to API ones, so you’ll have to either pay or do it the longer manual way we showed above for every single image you’ve got (anyone aware of any free plugins, contact me and let me know).
